

[Thumbnail image links are listed below this post | Los enlaces en imágenes de los productos se encuentran publicados al final de esta publicación]
Hello there! It's me, Cha! This week I have been playing with foil sheets. I just got one silver pack and I gave it many tries. For me, it was a little complicated at the beginning because I wasn't having good results but I just figured out how thanks to Jennifer Mcguire's YouTube Channel. For today blog post, I made two cards with two different ways of applying foil. I hope you like it!

¡Hola a todos! ¡Soy Cha! Esta semana he estado practicando con las hojas de foil. Solamente tengo un pack de foil plateado al que le he dado muchísimos usos. Para mí, aplicar foil ha sido complicado al principio porque no estaba obteniendo buenos resultados pero, luego, averigüé cómo gracias a Jennifer Mcguire. Para hoy, he realizado dos tarjetas con dos maneras diferentes para la aplicación de foil. ¡Espero que les guste!
Hello there! It's me, Cha! This week I have been playing with foil sheets. I just got one silver pack and I gave it many tries. For me, it was a little complicated at the beginning because I wasn't having good results but I just figured out how thanks to Jennifer Mcguire's YouTube Channel. For today blog post, I made two cards with two different ways of applying foil. I hope you like it!
¡Hola a todos! ¡Soy Cha! Esta semana he estado practicando con las hojas de foil. Solamente tengo un pack de foil plateado al que le he dado muchísimos usos. Para mí, aplicar foil ha sido complicado al principio porque no estaba obteniendo buenos resultados pero, luego, averigüé cómo gracias a Jennifer Mcguire. Para hoy, he realizado dos tarjetas con dos maneras diferentes para la aplicación de foil. ¡Espero que les guste!
In order to apply hot foiling, I've used a regular laminator but there is one special laminator that it is recommended for foiling technique - the MINC. However, we must be sure that machines can be used in our country due to the electrician requirements that are different for each continent. So, I do not know if this machine is available in Europe. Anyway, this technique can be used with a laminator that you can find in a local store.
Para aplicar el foiling caliente, he utilizado una plastificadora regular pero hay una plastificadora especial que es recomendada para realizar la técnica foiling - la MINC. Sin embargo, debemos estar seguro que estas máquinas se puedan utilizar en nuestro país ya que debemos tener en cuenta los requisitos eléctricos para cada continente. No sé con certeza si esta máquina está disponible para Europa. De todas maneras, esta técnica se puede utilizar con una plastificadora que puedes encontrar en una tienda local.
First of all, I decided to apply the foil to my backgrounds. I turned on the laminator since the beginning because I wanted it to be super hot before using. I applied foil in two different ways, using the laminator - 1) stamping and, 2) spraying.
En primer lugar decidí aplicar el foil para los fondos de tarjeta. Encendí la plastificadora desde el principio porque quería que estuviese super caliente antes de utilizar. Fijé el foil de dos maneras diferentes y utilizando la plastificadora - 1) con estampado de sellos y, 2) rociando con spray.
Primero, posicioné un trozo de cartulina blanca en la Plataforma de Estampación de Viaje de Tim Holtz. Utilicé un sello de goma de fondo - Festive Baubles Bold Prints de Hero Arts. Impregné este sello con la tintaVersamark y, añadí los polvos de embossing Sticky. Este tipo de polvos de embossing son perfectos para aplicar purpurina o foil. Entonces utilicé la pistola de embossing o calor para secar los polvos. Para este fondo, apliqué el foil plateado sobre la cartulina y la pasé por la plastificadora directamente, es decir, sin ninguna funda protectora o papel de horno. Cuidado a la hora de realizar esta técnica ya que no todas las plastificadoras son iguales. Dejé el foil algunos segundos para que se enfriara y lo quité de la cartulina. ¡El resultado es increíble! ¡Me ha encantado! Debo decir que hice muchos intentos con la funda protectora y los resultados no fueron buenos para nada ya que quedaban muchas áreas sin foil.
Finalmente, corté 1/8 pulgadas cada borde de la tarjeta para luego crear un marco alrededor.
The second way, I applied to a piece of white cardstock some Distress Resist Spray. In order not to spray on my work surface, I put my piece of cardstock inside of a carton box. Then, I sprayed Distress Resist. I added some silver foil on top of my piece and passed through the laminator without any protective folder or parchment paper again. I gave it some seconds to cool and removed the remaining foil from the cardstock. I also cut 1/8 inches each border in order to create a frame around it.
Segundo, rocié un trozo de cartulina blanca con el Distress Resist Spray. Para no ensuciar la mesa de trabajo, puse la cartulina dentro de una caja de cartón. Entonces, rocié la cartulina con este spray - Distress Resist. Añadí la pieza de foil plateado encima de la cartulina y la pasé por la plastificadora sin ninguna funda protectora o papel de horno. Le dejé algunos segundos para que se enfriara y quité el foil que quedó en la cartulina. También recorté cada borde en 1/8 pulgadas para crear un marco alrededor.

Now I turned these two backgrounds into elegant cards!
¡Ahora convertí estos dos fondos en dos tarjetas elegantes!

 |
| ABNH Challenge AUGUST 2018 | ABNH Reto AGOSTO 2018 |
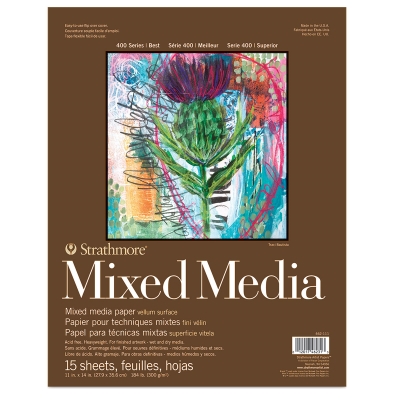
For my first card, I used the layering rose stamp set and the coordinating dies from Hero Arts. I positioned the solid elements of this set on the Travel Stamp Platform. For this, I used a piece of mixed media paper and some distress markers. I colored the rose stamp with blueprint sketch and hickory smoke and for the leaves and the steam, I mixed two colors - twisted citron and cracked pistachio. I sprayed some water on top of the stamps and stamped the images firmly. I added some brown color (ground espresso) to the bottom of the stem. Later, I used the coordinating dies to die cut the images. For my die cutting, I used the Big Shot machine.
Para mi primera tarjeta, utilicé el set de sellos y los troqueles coordinados de Hero Arts - layering rose. Positioné los sellos más sólidos (primera capa de sello) de este set en la Plataforma de Estampación de Viaje. Para ello, utilicé un trozo de papel mixed media y algunos rotuladores distress. Coloreé el sello de rosa con los colores blueprint sketch y hickory smoke y, para las hojas y el tallo, mezclé dos colores verdes - twisted citron and cracked pistachio. Rocié con agua los sellos y estampé las imágenes firmemente. También añadí un poco de marrón (ground espresso) a la parte inferior del tallo. Más tarde utilicé los troqueles coordinados para cortar las imágenes. Para troquelar, utilicé la máquina troqueladora de Big Shot de Sizzix.

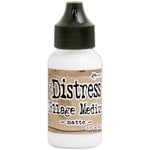
As my images were too dark in colors, I decided to turn white. So, I picked a piece of vellum and added some anti-static powder tool. Then, I positioned on the Travel Stamp Platform and changed the stamps to the last layer. I stamped these images to the vellum using Versamark ink and added some white detail embossing powder. I heat it with my heat gun little by little because this paper could shrink easily due to the heat. I also die cut the images with the coordinating dies. I glued these vellum pieces on top of the colored ones using a strong liquid adhesive - Distress collage medium.
Como mis imágenes era muy oscuras en colores, decidí blanquearlas un poco. Así que cogí un trozo de papel vellum y añadí la herramienta de polvo antiestática. Entonces posicioné el papel en la Plataforma de Estampación de Viaje y cambié los sellos a la última capa, tanto la rosa como las hojas y el tallo. Estampé estas imágenes con la tinta Versamark y añadí polvos de embossing white detail. Los sequé con la pistola de calor poco a poco porque esta papel es muy delicado y es fácil de romper con el calor. Troquelé las imágenes con los troqueles coordinados. Pegué estas piezas de vellum encima de las imágenes coloreadas y utilizando un adhesivo líquido - Distress collage medium.

For my sentiment, I used a past MMH kit from Hero Arts - March 2018. I decided to stamp the phrase "thinking of " on a strip of white cardstock with Distress Oxide - faded jeans. Then, I added some shimmering pearl embossing powder and I heat set it. From this set, I also used the "you" die. I inked this word with Versamark ink and I added some silver embossing powder and heat it with my heat gun. I glued this piece on a piece of vellum and cut it around the word with scissors.
Para la frase, utilicé un pasado kit de Hero Arts - MMH Marzo 2018. Decidí estampar la frase "thinking of you" ("pensando en tí" en español) en una tira en cartulina blanca y con la tinta Distress Oxide - faded jeans. Añadí los polvos de embossing - shimmering pearl y los sequé con la pistola de calor. De este set, también utilicé el troquel "you". Impregné esta palabra con la tinta Versamark y añadí polvos de embossing - silver. Sequé la pieza con la pistola de calor. Pegué esta pieza sobre un trozo de papel vellum y recorté alrededor de la palabra "you" con unas tijeras.

For mounting my card, I glued a piece of white craft foam to the main background in order to give some dimension to the card. Later, I added the images. I added the stem of the rose in the middle of the card with some strong liquid adhesive. Next, I added the flower at the top with some foam squares and the leaves, one leaf on the right and the other one to the left, also with foam squares. I added the strip band with one of the sentiment underneath the leaves with some double-sided adhesive and, finally, underneath this sentiment, I added the word "you" with some foam squares.
Para montar la tarjeta, pegué una hoja de foamy o goma eva blanca al fondo principal de la tarjeta para dar relieve. A continuación, añadí las imágenes. Añadí el tallo de la rosa en el medio de la tarjeta utilizando un adhesivo líquido fuerte. Después, añadí la flor en la parte superior y sobre el tallo con algunos cuadros adhesivos de espuma y las hojas, una la añadí a la derecha y la otra a la izquierda, también con los cuadros adhesivos de espuma. Luego, pegué la tira con la frase debajo de las hojas con cinta adhesiva de doble cara y, finalmente, debajo de esta frase, añadí la palabra "you" con cuadritos adhesivos de espuma.

For embellishing the card, I added some adhesive pearls and some shimmer to the rose with the NUVO aqua shimmer pen.
Para adornar la tarjeta, añadí perlas adhesivas en el fondo y purpurina a la rosa con el NUVO aqua shimmer pen.


For the second card, I used the peony blossom and the coordinating dies from Altenew. I positioned the solid stamps (first layer) on the Travel Stamp Platform. For this, I used a piece of mixed media paper and some distress markers. I colored the flower stamp with mermaid lagoon Distress marker. Then, I positioned the second layer of this stamp on the Stamp Platform, added blueprint sketch, sprayed some water and stamped on top of the other layer that I stamped before. I also added the piece in the center of the flower and stamped with white unicorn pigment ink. Later, I added some shimmering pearl embossing powder and heat it. For the first layer of the leaves, I added hickory smoke Distress marker, sprayed some water and stamped onto the piece of cardstock. I changed this a little bit and I picked the third and last layer, I stamped with white unicorn pigment ink and added some shimmering pearl embossing powder and heat it. Later, I used the coordinating dies to die cut the images and, also, I die cut some leaves on vellum. For my die cutting, I used the Big Shot machine.
Para la segunda tarjeta, utilicé el set de sellos y los troqueles coordinados de Altenew - peony blossom. Puse los sellos sólidos (la primera capa) en la Plataforma de Estampación de Viaje. Para ello, utilicé cartulina mixed media y rotuladores Distress. Coloreé el sello de flor con el rotulador mermaid lagoon, rocié con agua y, a continuación, estampé en mi panel. Después, puse la segunda capa de este set de sellos en la plataforma y pinté con el rotulador blueprint sketch, rocié con agua y estampé encima de la otra capa que había estampado antes. Añadí el sello del centro de la flor y lo estampé utilizando la tinta de pigmento unicorn white. Más tarde, añadí los polvos de embossing - shimmering pearl y los sequé con la pistola de calor. Para la primera capa de las hojas, las coloreé con el rotulador hickory smoke, rocié agua sobre los sellos y estampé sobre la cartulina. Luego puse la tercera y última capa de sello, estampé con la tinta de pigmento unicorn y añadí polvos de embossing - shimmering pearl y los sequé con la pistola de calor. Luego, utilicé los troqueles coordinados y troquelé las imágenes y, también, troquelé algunas hojas en papel vellum. Para troquelar, utilicé la máquina de la Big Shot.


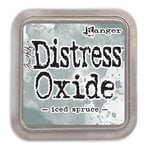
For my sentiment, I also used a past MMH kit from Hero Arts - March 2018. I decided to stamp the word "sending" on a strip of white cardstock with Versamark ink. Then, I added some silver embossing powder and I heat set it. From this set, I also used the "hugs" die. I inked some Distress Oxide - iced spruce and added some shimmering pearl embossing powder. Later I heat it with my heat gun. I also cut three pieces of this word on a piece of white cardstock in order to give some dimension. I attached the four pieces together.
Para la frase, también utilicé un kit de Hero Arts anterior - MMH kit marzo 2018. Descidí estampar la palabra "sending" con Versamark ink en una cartulina blanca y en una tira que recorté con tijeras. Entonces añadí los polvos de embossing - silver y los sequé con la pistola de calor. De este set, también utilicé la el troquel "hugs". Impregné la tinta Distress Oxide - iced spruce y añadí los polvos de embossing - shimmering pearl. Después los sequé con la pistola de calor. También troquelé tres piezas de esta palabra en cartulina blanca para dar relieve a la palabra. Adherí los cuatro juntos.

For mounting my card, I glued a piece of white craft foam to the main background in order to give some dimension to the card. Later, I added the images. I glued the leaves and the vellum leaves under the flower with some double-sided tape and liquid adhesive. I also die cut a centerpiece of the flower on silver mirror cardstock. Then, I added some foam squares to the flower and added to the card. Later, I added the sentiment strip with one of the sentiments next to the flower with some foam squares and the word "hugs" at the bottom of the card.
Para montar la tarjeta, pegué un trozo de foamy o goma eva blanca con el panel principal para dar relieve. Más tarde, añadí las imágenes. Pegué las hojas y las hojas de vellum bajo la flor con cinta adhesiva de doble cara y adhesivo líquido. También troquelé la pieza central de la flor en cartulina de espejo - silver (plateada). Añadí cuadrados adhesivos de espuma a la flor y la adherí a la tarjeta. Más tarde añadí la palabra en forma de tira al lado de la flor con cuadrados adhesivos de espuma y la palabra "hugs" en la parte inferior de la tarjeta.
For embellishing the card, I added an adhesive white pearl in the center of the flower.
Para adornar la tarjeta, añadí una perla blanca adhesiva en el centro de la flor.

I hope you like this card and remember to subscribe to my blog in order to receive my latest posts!
Thank you for stopping by!
Espero que les gusteesta tarjeta y recuerden ¡subscribirse a mi blog para recibir mis últimas publicaciones!
¡Gracias por venir!


For Americans, I highly recommend the Wagner heat tool from Hero Arts. I cannot use this tool because I live outside of the States and this tool cannot be used internationally due to the electrician requirements that are not the same for all the continents. No possible for use with outlet adapters.
I use Artemio heat gun (available in Europe only).
Para los americanos, recomiendo la pistola de embossing de Hero Arts - Wagner. No puedo utilizar esta herramienta porque vivo fuera de los EEUU y es incompatible debido a los requisitos eléctricos que no son iguales para todos los continentes. Tampoco es posible utilizarse con un adaptador.
Utilizo la pistola de calor de Artemio (disponible solo para Europa)
[Not all the thumbnail image links take part of Affiliate Programs | No todos los enlaces en imágenes forman parte del Programa de Afiliados]


.jpg)
.jpg)
.jpg)

0 Comments