

[Product links are listed down below | Los links de Productos están alistados al final]
Hello there! It's me, Cha! A couple of weeks ago, I received my first order from Altenew and I was so excited to have received it but, in fact, I hadn't played with the new supplies because I've been very busy lately, and that's why I showed you my Altenew Haul two weeks ago! So, I played with some of the supplies last weekend and here it is finally! I hope you like the card!

¡Hola a todos! ¡Soy Cha! Hace un par de semanas recibí mi primer pedido de Altenew y fue bastante emocionante recibirlo pero, la verdad es que no había podido jugar con el nuevo material porque he estado muy ocupada últimamente y, por ello, les enseñé el Haul de Altenew hace algunas semanas. Así que por fin, el fin de semana le dí un poco de juego y aquí está el resultado. ¡Espero que les guste esta nueva tarjeta!
¡Hola a todos! ¡Soy Cha! Hace un par de semanas recibí mi primer pedido de Altenew y fue bastante emocionante recibirlo pero, la verdad es que no había podido jugar con el nuevo material porque he estado muy ocupada últimamente y, por ello, les enseñé el Haul de Altenew hace algunas semanas. Así que por fin, el fin de semana le dí un poco de juego y aquí está el resultado. ¡Espero que les guste esta nueva tarjeta!
First of all, I took a 120 lb. folded card from white cardstock and positioned it on my Tim Holtz Stamp Tool. I preferred to use this tool because I wanted to stamp the images several times to get a scrip image. For this card, I used Altenew 'Love you a mush' stamp set. I really love this layering stamp set because you can choose some different sizes of mushrooms!
Primero, escogí una base de tarjeta de 120 libras y la posicioné en mi Plataforma de Estampado de Tim Holtz. Preferí utilizar esta herramienta porque quería estampar las imágenes varias veces para obtener una imagen más definida. Para esta tarjeta decidí utilizar unos sellos en capa de setas de Altenew llamado 'Love you a mush'. La verdad me gusta mucho este juego de sellos porque vienen diferentes tamaños de setas y con sus respectivas capas.
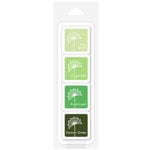
For my first solid image of the big mushroom, I positioned it on the center of my cardstock using Coral Bliss crisp dye ink from Altenew and for its second layer, I used Heart Beat crisp dye ink. Then, I also stamped the first layer or solid image of the middle mushroom on both sides of this big mushroom. First, I created two of this on the right side using Rose Quartz and Pink Pearl crisp dye ink, and other two, on the left, using Cosmic Berry and Heart Beat crisp dye ink. I also lined up onto each image the second layer and stamped the first two on the right side with Purple Wine and Coral Bliss crisp ink, and the other two with Vineyard Berry and Cosmic Berry crip dye ink. I also stamped the first layer of the small mushroom twice, using Hero Arts Pink Tourmaline and Ruby.
Para mi primera imagen, decidí estampar la seta más grande y empezando por la primera capa, es decir, la imagen sólida. Posicioné la imagen en el centro de la tarjeta y la estampé utilizando la tinta Altenew (de tinte definido 'Crisp Dye Ink') llamada Coral Bliss, y para estampar su segunda capa, utilicé el mismo tipo de tinta pero en otro color, Heart Beat. Más tarde, estampé otras setas en el panel. La seta mediana del set de sellos, la estampé varias veces en el lado derecho del panel y, también, en el lado izquierdo, pero en diferentes colores. Para las setas del lado derecho, estampé la primera capa con las tintas Rose Quartz y Pink Pearl, y para el lado izquierdo, las tintas Cosmic Berry y Heart Beat. Para estas setas, también estampé la segunda imagen de sellos, las dos de la derecha con las tintas Purple Wine y Coral Bliss, y para las otras de la parte izquierda, Vineyard Berry y Cosmic Berry. También estampé el sellito de la seta más pequeña en cada lado de la seta central, utilizando las tintas de Hero Arts Pink Tourmaline y Ruby.

Finally, I stamped the third layer of each image using Versamark Ink after using the anti-static powder tool to remove electricity from the paper. Then, I added some white embossing powder and heat it the panel with my heat gun.
Finalmente, estampé la tercera capa de cada imagen utilizando la tinta Versamark después de utilizar la herramienta anti-estática para eliminar la electricidad del papel. Después, le añadí los polvos de embossing blanco y los derretí con la pistola de calor.
The inks Pink Tourmaline and Ruby from Hero Arts were part of the Hero Arts kits (My Monthly Hero), so they aren't weren't available anymore. Below I added some links for this inks that could be similar to these ones.
Las tintas Pink Tourmaline y Ruby de Hero Arts son parte de los kits de Hero Arts (My Monthly Hero), por ello, no están disponible más. Más abajo he añadido algunos enlaces de tintas de Hero Arts que podrían ser parecidas a estas.
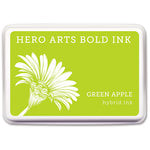
Then, I moved on to stamp the stems of the mushrooms. I masked the mushrooms temporarily with post-its (mine are not full sticky). I also used the Tim Holtz Stamp Platform because I was going to stamp the images several times. I stamped the stems using Hero Arts Green Apple dye ink. As I also wanted some darker areas on the stems, I also tapped with Hero Arts Forever Green dye ink the stem stamp and stamped again on top of the first stamping that I did before.
Entonces comencé a estampar el pie de las setas. Enmascaré los sombreros de las setas con post-its temporalmente (los míos son los comunes, no se pega toda la página). Para estampar, utilicé la Plataforma de Estampación de Tim Holtz ya que iba a estampar la misma imagen varias veces. Estampé el pie de las setas con la tinta Green Apple de Hero Arts. Como quería algunas partes de los pies con un color algo más oscuro, decidí emplear un poco de la tinta Forever Green de Hero Arts en el sello y estamparlo en la imagen suavemente sobre la imagen que había estampado anteriormente.

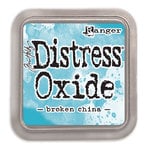
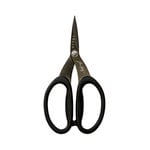
For coloring my background, I wanted to mask very well the mushrooms. So, I painted each mushroom (caps and stems) with Masking Fluid. When I finished masking all the images, I used one cloud stencil and colored the background using Distress Oxide Broken China. I created the stencil of clouds using my electronic cutting machine, but you can create your own stencil cutting a piece of acetate using a pair of scissors or with cloud dies in your Big Shot.
Para colorear el fondo, quería enmascarar las setas muy bien. Así que pinté cada seta (sombreros y pies) con el Líquido de Enmascarar. Cuando terminé de enmascarar todas las imágenes, utilicé un estencil de nubes y que coloreé con la tinta Distress Oxide Broken China. Creé el estencil de nubes con mi plotter Silhouette, pero puedes crear tu propio estencil con un trozo de acetato recortado con unas tijeras o, simplemente, con tu Big Shot y utilizando unos troqueles de nubes.
For my sentiment, I decided to stamp one of the sentences from the same stamp set ('You're such a 'fungi'') at the top of the card and also using Versamark ink and white embossing powder.
Para la frase, decidí estampar una de las frases del mismo set de ellos en la parte superior de la tarjeta y utilizando también la tinta Versamark y polvos de embossing blanco.

For the gap at the bottom of my card, I die cut some pieces of grass from Hero Arts Fancy Dies set. I colored some pieces with Distress Ink Shabby Shutters. Once I colored my pieces, I started to glue all the pieces one by one from the middle to the bottom of the card and overlapping a little bit all the pieces.
Para la parte inferior de la tarjeta, añadí unas piezas de césped previamente cortadas con el troquel de césped de Hero Arts Fancy Dies. Coloreé estas piezas con la tinta Distress Ink Shabby Dhutters. Una vez coloreadas, comencé a pegar todas las piezas una a una desde la mitad hasta la parte inferior de la tarjeta y solapando un poquito todas las piezas por su parte inferior.
For final touches, I added some white gel pen and Wink of Stella glitter clear.
Para los toques finales, añadí algunos toques con el gel pen de color blanco (boli o lapicero de gel) y un poco de brillo sobre las setas utilizando el Wink of Stella glitter clear.
I hope you like this card and I ask you a little patient because I'm busy because of my exams.
Thanks a lot! and see you the next time!
Espero que les haya gustado esta tarjeta para hoy y les pido algo de paciencia debido a que estoy ocupada con mis exámenes.
¡Muchas gracias! y espero verles pronto.

Primero, escogí una base de tarjeta de 120 libras y la posicioné en mi Plataforma de Estampado de Tim Holtz. Preferí utilizar esta herramienta porque quería estampar las imágenes varias veces para obtener una imagen más definida. Para esta tarjeta decidí utilizar unos sellos en capa de setas de Altenew llamado 'Love you a mush'. La verdad me gusta mucho este juego de sellos porque vienen diferentes tamaños de setas y con sus respectivas capas.
For my first solid image of the big mushroom, I positioned it on the center of my cardstock using Coral Bliss crisp dye ink from Altenew and for its second layer, I used Heart Beat crisp dye ink. Then, I also stamped the first layer or solid image of the middle mushroom on both sides of this big mushroom. First, I created two of this on the right side using Rose Quartz and Pink Pearl crisp dye ink, and other two, on the left, using Cosmic Berry and Heart Beat crisp dye ink. I also lined up onto each image the second layer and stamped the first two on the right side with Purple Wine and Coral Bliss crisp ink, and the other two with Vineyard Berry and Cosmic Berry crip dye ink. I also stamped the first layer of the small mushroom twice, using Hero Arts Pink Tourmaline and Ruby.
Para mi primera imagen, decidí estampar la seta más grande y empezando por la primera capa, es decir, la imagen sólida. Posicioné la imagen en el centro de la tarjeta y la estampé utilizando la tinta Altenew (de tinte definido 'Crisp Dye Ink') llamada Coral Bliss, y para estampar su segunda capa, utilicé el mismo tipo de tinta pero en otro color, Heart Beat. Más tarde, estampé otras setas en el panel. La seta mediana del set de sellos, la estampé varias veces en el lado derecho del panel y, también, en el lado izquierdo, pero en diferentes colores. Para las setas del lado derecho, estampé la primera capa con las tintas Rose Quartz y Pink Pearl, y para el lado izquierdo, las tintas Cosmic Berry y Heart Beat. Para estas setas, también estampé la segunda imagen de sellos, las dos de la derecha con las tintas Purple Wine y Coral Bliss, y para las otras de la parte izquierda, Vineyard Berry y Cosmic Berry. También estampé el sellito de la seta más pequeña en cada lado de la seta central, utilizando las tintas de Hero Arts Pink Tourmaline y Ruby.
Finally, I stamped the third layer of each image using Versamark Ink after using the anti-static powder tool to remove electricity from the paper. Then, I added some white embossing powder and heat it the panel with my heat gun.
Finalmente, estampé la tercera capa de cada imagen utilizando la tinta Versamark después de utilizar la herramienta anti-estática para eliminar la electricidad del papel. Después, le añadí los polvos de embossing blanco y los derretí con la pistola de calor.
The inks Pink Tourmaline and Ruby from Hero Arts were part of the Hero Arts kits (My Monthly Hero), so they aren't weren't available anymore. Below I added some links for this inks that could be similar to these ones.
Then, I moved on to stamp the stems of the mushrooms. I masked the mushrooms temporarily with post-its (mine are not full sticky). I also used the Tim Holtz Stamp Platform because I was going to stamp the images several times. I stamped the stems using Hero Arts Green Apple dye ink. As I also wanted some darker areas on the stems, I also tapped with Hero Arts Forever Green dye ink the stem stamp and stamped again on top of the first stamping that I did before.
Entonces comencé a estampar el pie de las setas. Enmascaré los sombreros de las setas con post-its temporalmente (los míos son los comunes, no se pega toda la página). Para estampar, utilicé la Plataforma de Estampación de Tim Holtz ya que iba a estampar la misma imagen varias veces. Estampé el pie de las setas con la tinta Green Apple de Hero Arts. Como quería algunas partes de los pies con un color algo más oscuro, decidí emplear un poco de la tinta Forever Green de Hero Arts en el sello y estamparlo en la imagen suavemente sobre la imagen que había estampado anteriormente.
For coloring my background, I wanted to mask very well the mushrooms. So, I painted each mushroom (caps and stems) with Masking Fluid. When I finished masking all the images, I used one cloud stencil and colored the background using Distress Oxide Broken China. I created the stencil of clouds using my electronic cutting machine, but you can create your own stencil cutting a piece of acetate using a pair of scissors or with cloud dies in your Big Shot.
Para colorear el fondo, quería enmascarar las setas muy bien. Así que pinté cada seta (sombreros y pies) con el Líquido de Enmascarar. Cuando terminé de enmascarar todas las imágenes, utilicé un estencil de nubes y que coloreé con la tinta Distress Oxide Broken China. Creé el estencil de nubes con mi plotter Silhouette, pero puedes crear tu propio estencil con un trozo de acetato recortado con unas tijeras o, simplemente, con tu Big Shot y utilizando unos troqueles de nubes.
For my sentiment, I decided to stamp one of the sentences from the same stamp set ('You're such a 'fungi'') at the top of the card and also using Versamark ink and white embossing powder.
Para la frase, decidí estampar una de las frases del mismo set de ellos en la parte superior de la tarjeta y utilizando también la tinta Versamark y polvos de embossing blanco.
For the gap at the bottom of my card, I die cut some pieces of grass from Hero Arts Fancy Dies set. I colored some pieces with Distress Ink Shabby Shutters. Once I colored my pieces, I started to glue all the pieces one by one from the middle to the bottom of the card and overlapping a little bit all the pieces.
Para la parte inferior de la tarjeta, añadí unas piezas de césped previamente cortadas con el troquel de césped de Hero Arts Fancy Dies. Coloreé estas piezas con la tinta Distress Ink Shabby Dhutters. Una vez coloreadas, comencé a pegar todas las piezas una a una desde la mitad hasta la parte inferior de la tarjeta y solapando un poquito todas las piezas por su parte inferior.
For final touches, I added some white gel pen and Wink of Stella glitter clear.
Para los toques finales, añadí algunos toques con el gel pen de color blanco (boli o lapicero de gel) y un poco de brillo sobre las setas utilizando el Wink of Stella glitter clear.
I hope you like this card and I ask you a little patient because I'm busy because of my exams.
Thanks a lot! and see you the next time!
Espero que les haya gustado esta tarjeta para hoy y les pido algo de paciencia debido a que estoy ocupada con mis exámenes.
¡Muchas gracias! y espero verles pronto.


DIY Ink blending tools | DIY Aplicadores de tinta


.jpg)
.jpg)
.jpg)
