

[Product links are listed down below the page | Los enlaces de los productos están alistados a final de página]
Hi there! It's me, Cha. I created several cards using the My Monthly Hero kit July 2019 and I wanted to share with you on YouTube and my blog. The kit is not available but I focused on how I assembled this card with the Xyron Sticker Machine that helps to mount the card easily. I got the disposable 3" maker machine that it is perfect for cardmaking.
¡Hola a todos! Soy Cha. He creado varias tarjetas utilizando el kit de Hero Arts My Monthly Hero Kit de Julio 2019 y quería compartir con ustedes en YouTube y aquí, en mi blog. El kit ya no estará disponible pero me centré en el montaje de esta tarjeta utilizando la Máquina Xyron para la Creación de Pegatinas que ayudan a montar la tarjeta de manera muy fácil. Compré la máquina de Xyron la que es desechable y de 3 pulgadas ya que es perfecta para tarjetería.


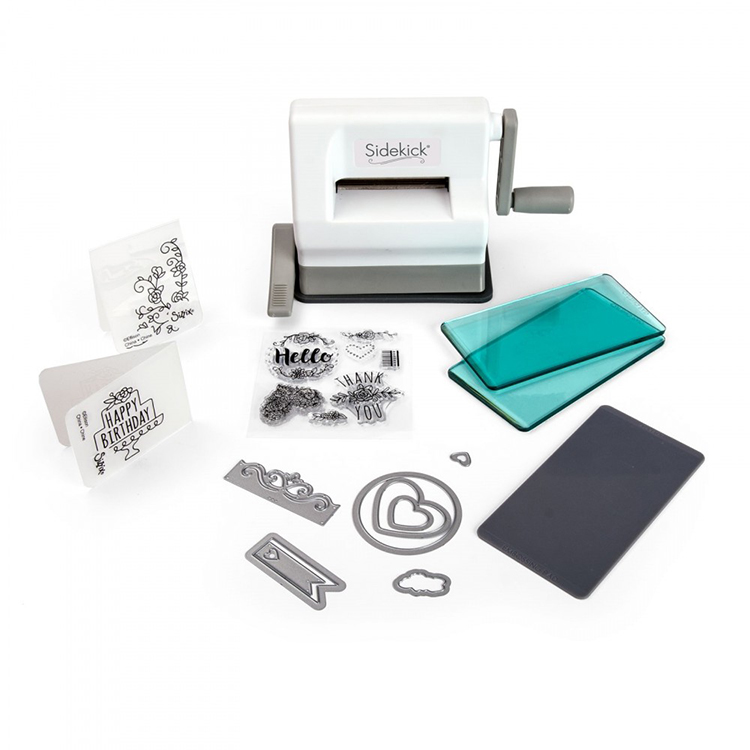
First of all, I die cut all the pieces in different colored cardstock and, as I was going to create a card in which the pieces are small, I used the Sidekick machine for die-cutting. I used different colored cardstock from Hero Arts (Hero Hues Premium Cardstock) - Dove White, Pesto, Kiwi, Palm, Meadow, Lapis, Sand, Canary, Mustard, Antique Ivory, Chesnut, Pitch Black. When I had all my pieces cut, I started to put together all the pieces of my card on top of a piece of watercolor paper in order to give some stability to the card. However, I recommend trimming the size that you want before starting mounting the card.
Primero, troquelé todas las piezas diferentes en diferentes cartulinas de colores y, como iba a crear una tarjeta en la que las piezas son pequeñas, utilicé la troqueladora pequeña Sidekick para troquelar. Utilicé diferentes cartulinas de colores de Hero Arts (Hero Hues Premium Cardstock) - Dove White, Pesto, Kiwi, Palm, Meadow, Lapis, Sand, Canary, Mustard, Antique Ivory, Chesnut, Pitch Black. Cuando tenía todas las piezas troqueladas, comencé a ensamblar todas las piezas de mi tarjeta sobre un trozo de papel de acuarela para darle estabilidad a la tarjeta. Sin embargo, recomiendo recortar el tamaño que quieres antes de comenzar a montar la tarjeta.

I glued a 4,25 by 5,5-inch Lapis cardstock on top of a piece of watercolor paper of the same size. I gave to this panel a little of color, applying to the edges a little bit of Navy Ink, using a sponge dauber. I also die cut two circles, one smaller than the other, on Canary and Mustard cardstock. I used the Nesting Circle Infinity set. I colored the piece of Canary cardstock with Butter Bar Ink. I passed the pieces through the Xyron Sticker Maker separately, removed the transparent paper and, first, I added the Mustard circle piece at the top center of the card. Then, I added the Canary circle piece on top of the another. In the middle of the card, I added some mountains that I die cut on a piece of Antique Ivory and stamped the second layer of the stamp set from the My Monthly Hero kit July 2019 with Sand Stone Ink (similar to Wet Cement Ink). I also turned these pieces into stickers with the Xyron Sticker Maker and added to the card.
Pegué un trozo de cartulina azul (Lapis) de 4,25 por 5,5 pulgadas sobre el papel de acuarela del mismo tamaño. Le dí a este panel un poquito de color, aplicando un poco de la tinta Navy Ink en los bordes, utilizando un aplicador de esponja (sponge dauber). También troquelé dos círculos, uno más pequeño que el otro, en cartulinas amarillas, Canary y Mustard. Utilicé el set de troqueles Nesting Circle Infinity Set. Coloreé el trozo de cartulina amarilla, Canary, con la tinta Butter Bar Ink. Pasé todas las piezas de una a una por la Máquina de Pegatinas Xyron, quité el papel transparente y, primero añadí el círculo Mustard en la parte superior central de la tarjeta. Luego, añadí el círculo Canary sobre el otro círculo. En medio de la tarjeta, añadí algunas montañas que troquelé sobre cartulina Antique Ivory y estampé la segunda capa de sello que venían con el kit My Monthly Hero kit de Julio 2019 con la tinta Sand Stone Ink (parecida a la tinta Wet Cement Ink). También las convertí en pegatinas con la Máquina Xyron y las añadí a la tarjeta.

What's more, I die cut some trees on Pesto, Palm, and Meadow cardstock. Then, I die cut another piece on Kiwi cardstock but I stamped the second layer using Pine Ink on top of it. I turned this piece into a sticker and added to the card, too. I added the rest of the trees. I die cut mountains on Chesnut cardstock and added to the card. I also added some more trees.
Además, troquelé algunos árboles en cartulinas Pesto, Palm y Meadow. Entonces, troquelé otro trozo en cartulina Kiwi pero estampé la segunda capa de sello utilizando la tinta Pine Ink sobre ella y la convertí en pegatina para añadirla a la tarjeta. Luego, añadí los demás árboles. Troquelé las montañas en cartulina Chesnut y las añadí a la tarjeta. También añadí algunos árboles en tiras más.
I colored the bottom part of the card blending Summer Sky Ink. I also stamped sea waves with Navy Ink and Deep Ocean Ink.
Coloreé la parte inferior de la tarjeta con la tinta Summer Sky Ink. También estampé las ondas del agua con la tinta Navy Ink y la tinta Deep Ocean.
Coloreé la parte inferior de la tarjeta con la tinta Summer Sky Ink. También estampé las ondas del agua con la tinta Navy Ink y la tinta Deep Ocean.

At the bottom of the card, I added the dock that I had die-cut on Sand cardstock and stamped the second layer with Cocoa Ink. I also added some plants at the sides of the dock. I die cut a child silhouette as he was jumping in the lake on Pitch Black cardstock and added over that dock with some adhesive foam adhesive squares. I must say that I didn't like the child over there!
En la parte inferior de la tarjeta, añadí el muelle de madera que había troquelado con cartulina Sand y estampado la segunda capa de sello con la tinta Cocoa Ink. También añadí algunas plantas en los laterales del muelle. Troquelé la silueta de un niño saltando en el lago sobre cartulina Pitch Black y lo añadí justo en el muelle, pegándolo con adhesivos de cuadrados de espuma. ¡Debo decir que no me gustó el niño ahí!
As this card has many details and dimension, I decided to stamp the sentiment inside of the card with Versafine Onyx Black Ink.
Como esta tarjeta tiene muchos detalles y relieve, decidí estampar la frase en el interior con la tinta Versafine Onyx Black Ink.

Besides, I die cut some clouds from the Color Layering Sea and Sky - Frame Cuts on vellum paper. I also glued these pieces with the Xyron Maker Sticker Machine.
Además, troquelé algunas nubes del set de troqueles coordinados Color Layering Sea and Sky Frame Cuts en papel Vellum. También pegué estas piezas con la Máquina Xyron para crear pegatinas.
Como esta tarjeta tiene muchos detalles y relieve, decidí estampar la frase en el interior con la tinta Versafine Onyx Black Ink.
Besides, I die cut some clouds from the Color Layering Sea and Sky - Frame Cuts on vellum paper. I also glued these pieces with the Xyron Maker Sticker Machine.
Además, troquelé algunas nubes del set de troqueles coordinados Color Layering Sea and Sky Frame Cuts en papel Vellum. También pegué estas piezas con la Máquina Xyron para crear pegatinas.
For final touches, I added some gold shimmer to the black silhouette and the sun with the NUVO shimmer Midas Touch.
Para toques finales, añadí algo de brillo dorado en la silueta del niño y en el sol con el NUVO shimmer Midas Touch.
Para toques finales, añadí algo de brillo dorado en la silueta del niño y en el sol con el NUVO shimmer Midas Touch.
I mounted the card on a Sand cardstock panel and then, I mounted the entire piece on top of a white folded card.
Monté la tarjeta sobre un trozo de cartulina Sand y luego, monté la pieza entera sobre una base de tarjeta blanca.

I hope you like this card and the way that I created! Remember that you can subscribe to my blog and my YouTube channel if you like my cards! Thank you so much.
Espero que les haya gustado esta tarjeta ¡y la forma en la que la he creado! Recuerden que pueden subscribirse a... ¡mi blog y mi Canal de YouTube si les gustan mis tarjetas! Muchas gracias.
See you soon!
¡Hasta pronto!


|


.jpg)
.jpg)
.jpg)

0 Comments